How to Find and Access WordPress Error Logs: A Beginner-Friendly Guide
-
 Last Updated On
Your WordPress site is working fine, but one day, a page doesn’t load or an unusual error pops up. Now, you’re panicking and wondering what happened.
But don’t worry, your site can help you find the exact error in the error logs. Learning how to find and access WordPress error logs can help you turn confusion into clarity. These logs record the exact issues, so you know what needs fixing.
In this guide, we’ll explore how to enable, locate, and use error logs. So, let’s get started!
Table of Contents
When something goes wrong on your WordPress site, the error log works like a report card for your website’s health. It records detailed information about problems such as PHP errors, plugin conflicts, or theme issues, so you can quickly identify what’s causing trouble.
Once you turn on WordPress debug mode, every error gets recorded in a file. Each entry includes the exact time the error happened, a description of the problem, the file path where it occurred, and even the specific line of code affected.
This is useful for identifying hidden issues like background errors or code conflicts that may be slowing down your site. If speed is a concern, explore our guide on improving WordPress website performance for more optimization tips.
Error logs can only help if WordPress is set to record them. By default, your site doesn’t save these details, so you have to switch on debug mode first.
Once you activate the WordPress debug mode, it starts keeping a record of errors. You can do this in two simple ways: use a plugin for a quick setup or make changes in the code. Let’s go through both methods one by one.
If you can log in to your WordPress admin area, the easiest way to enable debug mode is by using a plugin like WP Debugging. This method is beginner-friendly, requires no code, and can be done in just a few clicks.
Here’s how to install the plugin:
Once activated, the plugin automatically turns on WordPress debug mode. You don’t need to configure anything; error logging will start immediately.
The plugin stores error details in a debug log file, which you can review later to troubleshoot problems.
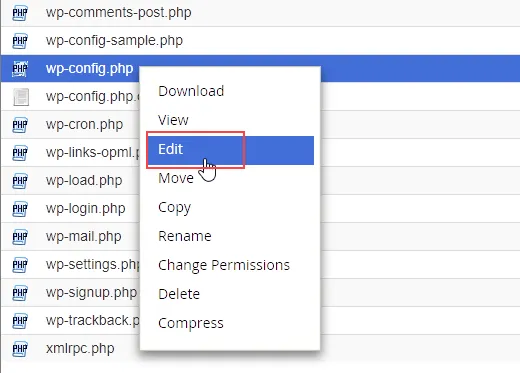
If you can’t log in to your WordPress dashboard, or if you prefer not to use a plugin, you can enable debug mode by manually editing your wp-config.php file. This method gives you more control but requires accessing your site files.
Here’s how to access your website files:
/* That’s all, stop editing! Happy publishing. */
define( ‘WP_DEBUG’, true );
define( ‘WP_DEBUG_LOG’, true );
Debug mode is now enabled, and WordPress will start saving errors to a log file. This method works even if your WordPress admin area is inaccessible.
Once you’ve enabled WordPress debug mode, your website will start recording errors in a log file. At first, this file may be empty because no new errors have been recorded yet. To collect error data, you’ll need to recreate the problem on your site.
Before you can check your logs, they need something to record. That means triggering the problem again so it gets saved in the log.
To view your error logs, you’ll need access to your site’s files. There are two main ways to do this:
Tip: If you’ve never used FTP before, check a beginner’s guide—it’s simpler than it sounds.
The debug log file is stored in a specific location inside your WordPress files.
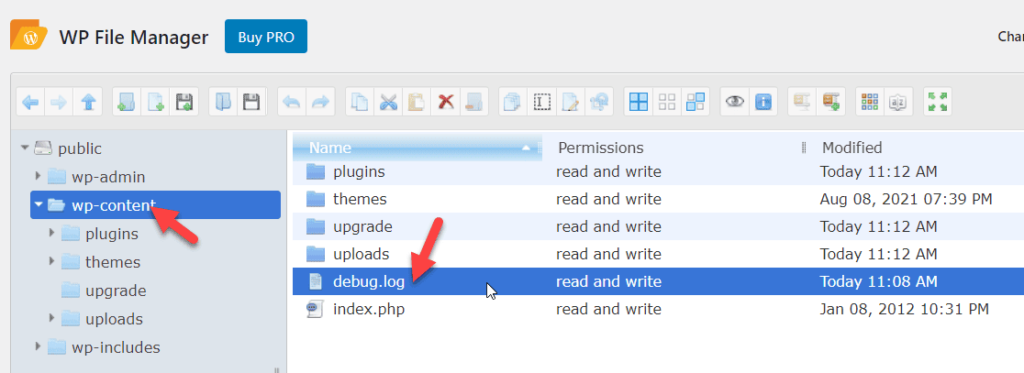
This file contains all error messages, warnings, and notices recorded since debug mode was enabled.
Once you’ve found the debug.log file, you can open it to see the details of the issues.
Inside the debug.log file, you’ll see:
Reading the log is just the first step; you also need to act on the details.
Now, fix the issue yourself or share the details with a developer for faster troubleshooting. If there are any major issues, you should consult a professional agency. Explore our blog on the top WordPress development companies, and you’ll find many options.
Once you’ve opened your debug log file, the next step is to use that information to fix the issues. The log entries tell you exactly what went wrong, where it happened, and when it occurred. Here are some of the most effective ways to resolve errors after reviewing your logs:
If you have experience working with WordPress code, you can use the log details to find the exact file and line where the problem is happening.
If you’re not confident editing code directly, make a full site backup before making any changes. One wrong edit could cause more issues.
Even if you don’t understand the error, chances are someone else has already encountered it and found a fix. The WordPress Support Forum is a valuable resource where millions of users share solutions.
This will help other members or experts provide you with accurate solutions.
Sometimes the quickest fix is to roll your website back to a version before the error happened.
Restoring a backup works best when you know the error is caused by a recent change, like installing a plugin or editing code.
If the issue is too complex or time-consuming to fix yourself, getting professional help is the safest option.
Once you’ve finished troubleshooting, it’s important to turn off debug mode. Leaving it enabled can slow down your site and may expose sensitive details to visitors or hackers.
Here’s how you can disable it depending on how you enabled it in the first place:
Open your website’s wp-config.php file using FTP, cPanel File Manager, or your hosting file editor.
define( ‘WP_DEBUG’, false );
Quick tip: Always remember to disable debug mode after fixing issues. This keeps your website running smoothly and prevents security risks.
WordPress error logs are incredibly helpful for spotting and fixing problems, but like any powerful tool, they work best when managed properly. If you ignore them or let them grow unchecked, they can slow your site, eat up server space, and even expose sensitive data. Here’s how to keep your logs useful, secure, and easy to work with.
Don’t wait for a major crash to look at your error logs. Spotting issues early can save you time and headaches.
Logs can look intimidating, but understanding them will help you troubleshoot effectively.
If you’re not comfortable editing code, plugins can make error logging much easier.
Error logs grow fast, and oversized files can be a pain to open and read.
Error logs can contain sensitive details like file paths, plugin names, and even database info.
Running debug mode on a live site can slow performance and leak data.
One wrong fix can break your site; always be prepared to roll back.
Not all issues are WordPress-specific. Sometimes, the problem starts at the server level.
Enable WP_DEBUG_LOG in your wp-config.php file, then check the debug.log file inside /wp-content/. You can open it via FTP or your hosting file manager to review the stored errors.
Set WP_DEBUG and WP_DEBUG_DISPLAY to true in your wp-config.php file. This will display all errors on your site, but only use it in staging for security reasons.
By default, WordPress doesn’t have audit logs. You can install plugins like WP Activity Log or Simple History to track user actions, content changes, and security events.
After enabling WP_DEBUG_LOG, go to /wp-content/ and open the debug.log file using FTP or your hosting file manager. It contains all recent WordPress error details.
Access debug.log in /wp-content/ and either delete it or clear its contents. WordPress will recreate the file automatically if error logging remains enabled.
Understanding and using WordPress error logs can save you time and frustration when troubleshooting issues. They are like a roadmap that shows exactly where things go wrong.
By learning how to view, read, and use these logs, you can solve problems faster, whether you fix them yourself, restore a backup, or get help from a developer.
The solution is to treat error logs as your guide, not just a tech tool. With a little practice, they can help you keep your WordPress site smooth, secure, and running at its best.